Putting a mustache drawing on face can be a truly fun way to change up your appearance for an event, a costume party, or just a silly afternoon. This creative act lets you try on different personas without the long-term commitment of growing actual facial hair. So, perhaps you are thinking about adding a touch of whimsy to your look or maybe you just want to surprise some friends.
You know, mustaches, those growths of facial hair grown above the upper lip and under the nose (/ ˈmʌstæʃ /), have quite a story. They have been worn in many different ways throughout time, sometimes symbolizing virility and toughness. Yet, in 2025, mustache trends are bolder than ever, mixing classic shapes with fresh styling ideas, which is quite interesting.
Actually, mustaches are making a bold comeback these days, thanks to Gen Z and a bit of 80s nostalgia. Hollywood, Movember events, and social media have certainly helped bring them back into the spotlight. So, drawing one on your face is a rather playful nod to this renewed popularity, allowing you to try out a style without growing a single hair.
Table of Contents
- Why Draw a Mustache on Your Face?
- Picking Your Materials: What You Will Need
- Getting Ready: Prepping Your Canvas
- Step-by-Step Drawing Your Mustache
- Tips for a Great Look
- Troubleshooting Common Issues
- Taking It Off: Easy Removal
- Mustache Styles to Consider
- Frequently Asked Questions
Why Draw a Mustache on Your Face?
Drawing a mustache on your face opens up a world of fun and temporary transformation. It is, in a way, a quick way to change your appearance for a costume, a themed gathering, or just for some laughs at home. This simple act lets you try out a whole new persona for a short while, without any real commitment.
Many folks, you know, use drawn mustaches for events like Halloween, school plays, or even Movember, which promotes men's health. It is a creative outlet, allowing you to experiment with different looks and see what suits your face, perhaps even inspiring a future real mustache if you decide to grow one. So, it is pretty versatile.
Plus, it is an activity that can be enjoyed by people of all ages, from kids playing dress-up to adults adding a playful touch to a party outfit. It is actually a very low-cost way to have a big impact on your look, making it a popular choice for many occasions.
Picking Your Materials: What You Will Need
To get a good mustache drawing on face, having the right materials is pretty important. You do not need a lot of fancy things, just a few key items that will help you create a clear and lasting design. It is all about choosing things that are safe for your skin and will give you the look you want.
You might already have some of these things lying around your house, which is quite convenient. Think about what kind of drawn mustache you want to achieve; this will help guide your material choices. So, let us look at what you will need to gather.
Makeup Choices for Your Drawn Mustache
When it comes to the actual color you put on your face, you have a few good options. Each one offers a slightly different finish and level of ease when applying. Choosing the right one depends on how long you need the mustache to last and how realistic you want it to appear.
Eyeliner Pencil or Gel Liner: These are probably the most accessible choices. A black or brown eyeliner pencil gives you good control for fine lines, especially for styles like the pencil mustache. Gel liner, applied with a thin brush, offers a more intense color and can be a bit smoother. Just make sure it is safe for skin, of course.
A good quality eyeliner, honestly, can make all the difference in getting sharp edges and a consistent color. You can find these at most drugstores, making them a very easy pick for many people.
Face Paint Sticks or Palettes: For something more opaque and perhaps a bit more dramatic, face paint is a solid choice. These come in various colors, but black and brown are your go-to shades for mustaches. Face paint often dries quickly and stays put for a longer time, which is nice.
You can find face paint designed specifically for skin, which is important for safety. It is usually water-activated, so you might need a small dish of water to get the right consistency. That is a pretty common way to use it.
Eyeshadow (Dark Shades): If you are looking for a softer, more blended look, dark brown or black eyeshadow can work. You would apply it with a damp, angled brush. This method is good for creating a shadow effect rather than a sharp line, giving a more subtle appearance.
This approach, you know, can be a bit more forgiving if you are not super confident with drawing straight lines. It is also quite easy to blend out if you make a small mistake, which is a definite plus.
Liquid Eyeliner: For really precise, thin lines, liquid eyeliner is a contender. It offers a strong, dark line. However, it can be a bit harder to control for beginners, and mistakes are less forgiving. It is probably best for those who have a steady hand and some drawing practice.
Using liquid eyeliner, basically, gives a very crisp finish. If you are aiming for a very defined style, like a thin line just above the lip, this could be your preferred tool.
Tools for the Job
Beyond the makeup itself, a few other tools will help you achieve a clean and polished mustache drawing on face. These are typically small, inexpensive items that can make a big difference in the final look.
Small Brushes: If you are using gel liner, face paint, or eyeshadow, a very fine-tipped brush or an angled eyeliner brush is essential. These brushes allow for precision and help you create hair-like strokes or fill in areas smoothly.
Having a couple of different brush sizes can be useful, too, for different parts of the mustache. A slightly wider flat brush might help with filling in, while a thin one is good for details, for example.
Cotton Swabs and Makeup Remover: Mistakes happen, and having cotton swabs dipped in makeup remover or micellar water nearby is crucial for quick clean-ups and corrections. This helps you refine edges and fix any smudges without starting over.
You know, a steady hand is great, but a quick way to correct a slip is even better. This combination makes the whole process much less stressful, honestly.
Mirror: A good, well-lit mirror is non-negotiable. You need to see what you are doing clearly to ensure symmetry and proper placement. A magnifying mirror can be particularly helpful for detailed work.
Sometimes, using a handheld mirror along with a wall mirror gives you different angles to check your work, which is pretty smart.
Setting Spray or Powder (Optional): To make your drawn mustache last longer, especially if you are going to be moving around a lot, a setting spray or a light dusting of translucent powder can help. This keeps the makeup from smudging or fading too quickly.
This step, basically, locks your masterpiece in place. It is a good idea for events where you want your mustache to stay looking good for hours.
Inspiration Images: As your text mentions, looking for a mustache style to suit your face or just some inspiration images can be a huge help. Having a picture of the style you want to draw right in front of you can guide your hand and help you achieve the desired shape. You know, there are 21 different mustache types with images out there, so plenty to pick from.
Whether it is the pencil mustache, which is a thin line of hair just above the lip and one of the more popular styles, or something bolder, a visual reference makes a big difference. This is where you can learn how to choose the best mustache style for you, what mistakes to avoid, and more.
Getting Ready: Prepping Your Canvas
Before you start your mustache drawing on face, a little preparation goes a long way. Think of your face as a canvas; a clean and smooth surface will help your drawn mustache look its best and stay put. This step is pretty quick but very important for a good outcome.
First, make sure your face is clean and dry. Wash it gently with your usual cleanser, then pat it completely dry. Any oils or moisture can make the makeup slip or not adhere well. So, a clean start is a must, basically.
Next, you might want to apply a light, oil-free moisturizer. Let it sink in completely before you start drawing. This can create a smoother surface for the makeup. Some people also use a makeup primer to help the drawn mustache last even longer, especially if they have oily skin. It is, you know, a bit like preparing a wall before painting.
Step-by-Step Drawing Your Mustache
Now for the fun part: actually drawing your mustache! We will go through a few popular styles, giving you a general idea of how to approach each one. Remember, practice makes perfect, so do not worry if your first attempt is not exactly what you imagined. You can always wipe it off and try again, which is quite nice.
The key, you know, is to start light and build up the color and shape gradually. This gives you more control and makes corrections easier. Also, try to keep your hand steady and use short, controlled strokes. Here are some ideas for different mustache types, as your text mentions there are many to choose from.
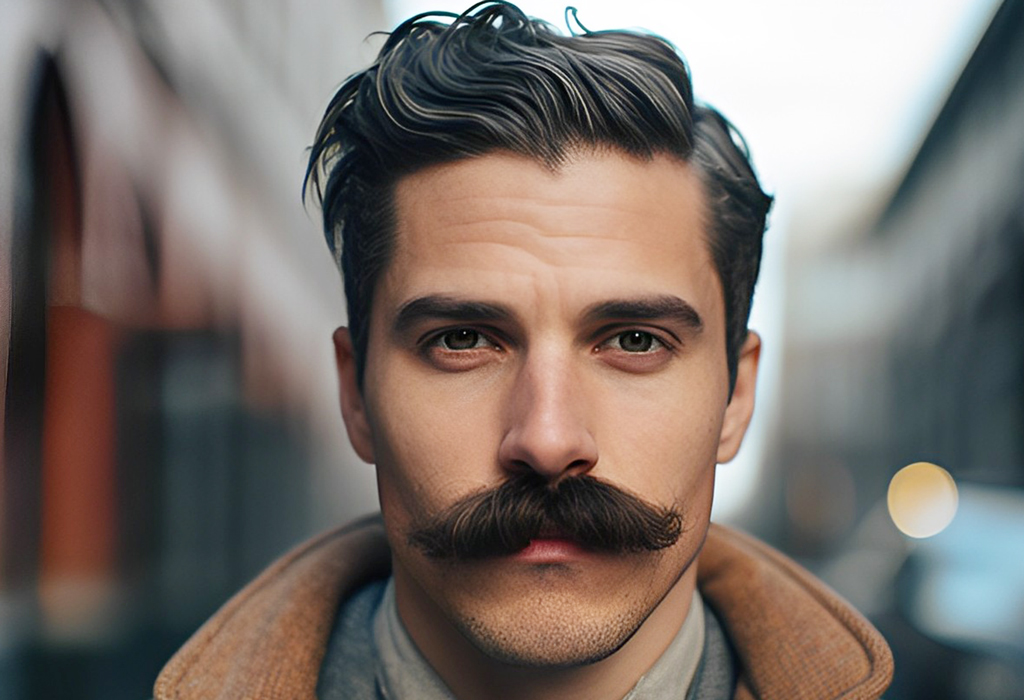
The Classic Pencil Mustache
The pencil mustache, as your text says, is a thin line of hair just above the lip and is quite popular. It is a very refined and subtle style, perfect for a vintage or sophisticated look. This one requires a steady hand for that crisp line.
Outline the Shape: Using a sharpened eyeliner pencil or a fine brush with gel liner, start by drawing a very thin line just above your upper lip. Begin in the center, directly under your nose, and extend it outwards towards the corners of your mouth. Keep the line consistent in thickness.
You want this line to be, you know, quite precise, so take your time with it. It is the foundation of this particular style.
Refine and Darken: Once you have the basic line, go over it gently to darken the color if needed. You can add very short, light strokes perpendicular to the main line to mimic tiny hairs, but keep it minimal to maintain the "pencil" look.
Make sure both sides are as symmetrical as you can get them. This is where a good mirror really helps, honestly.
Clean Up: Use a cotton swab with a tiny bit of makeup remover to clean up any stray marks or to sharpen the edges. This step is pretty important for a clean, polished finish.
It is all about that crisp line for the pencil mustache, so do not skip the clean-up, you know.
The Bold Chevron
The chevron mustache is a fuller, thicker style that covers the entire area between the nose and the upper lip. It is a very classic and strong look, often associated with a certain kind of rugged charm. This one is less about fine lines and more about solid color.
Define the Upper Edge: Start by drawing a line just under your nose, following the natural curve of your upper lip line. This will be the top boundary of your mustache. You can use an eyeliner pencil or a small brush with face paint.
This line, you know, sets the overall width of your chevron, so place it carefully.
Outline the Lower Edge: Draw another line just above your upper lip, mirroring the curve of your lip. This creates the bottom boundary. Connect the ends of these two lines on each side, forming the basic shape.
Make sure this shape, basically, feels balanced on your face before you start filling it in.
Fill It In: Using face paint or a dark eyeshadow with a brush, start filling in the outlined area. Use short, light strokes that mimic hair growth, or simply fill it in with solid color for a more cartoonish effect. Build up the color gradually.
You can add a bit of texture by varying your strokes, which is a nice touch for a more realistic look, you know.
Shape and Refine: Use your cotton swab and makeup remover to clean up the edges, making them crisp and neat. Ensure the shape is symmetrical and covers the area evenly.
This style, really, looks best when it is full and well-defined, so take your time shaping it.
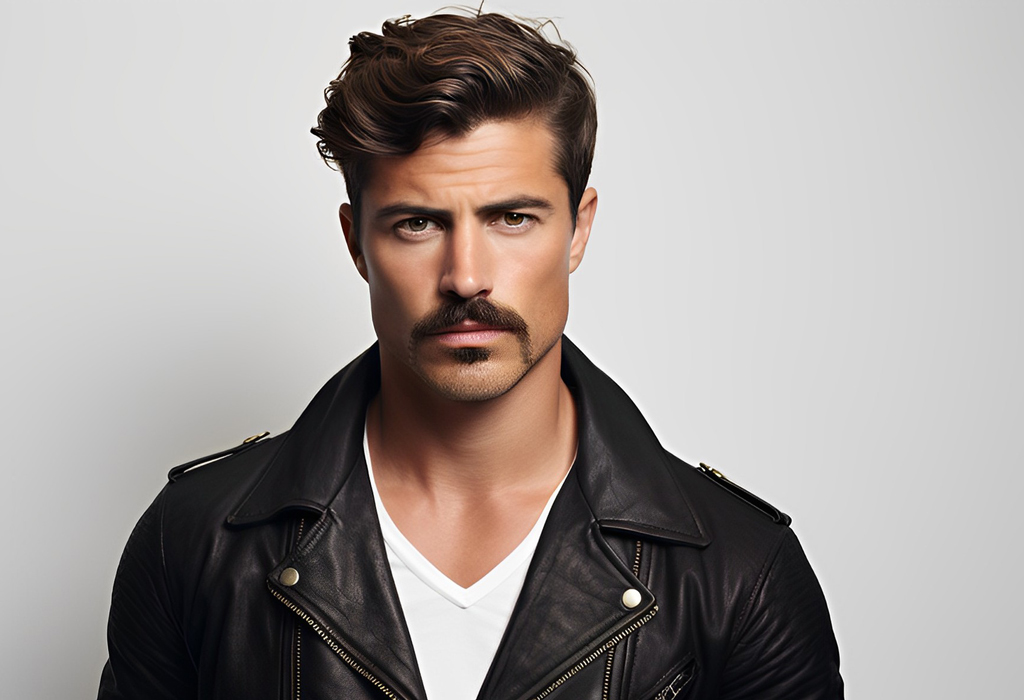
The Curled Handlebar
The handlebar mustache is known for its distinctive upward-curling ends, giving it a very grand and theatrical appearance. This style is a bit more involved to draw, as it requires creating those signature curls. It is a rather fun one to try for a playful or historical costume.
Draw the Main Body: Start by drawing a shape similar to a chevron, covering the area above your upper lip, but keep the ends a bit longer and thinner than a typical chevron. This is the base of your handlebar.
You want this part to be, you know, a solid foundation for the curls you are about to add.
Create the Curls: From the elongated ends of your main mustache body, draw upward-curling spirals or loops. Use a fine-tipped brush or eyeliner pencil for precision. Think of drawing a small "C" shape that then curves back on itself.
This is where the handlebar really gets its character, so try to make the curls look even, you know.
Fill and Define: Fill in the entire mustache, including the curls, with your chosen makeup. Use short strokes to mimic hair texture if you like, or keep it solid. Go back and define the edges of the curls and the main body with your cleanup tools.
A very clean outline, honestly, makes the handlebar pop and look intentional.
The Dashing Dalí
Inspired by the famous artist, the Dalí mustache is extremely thin and elongated, with dramatic upward-pointing tips. This style is quite artistic and playful, perfect for making a bold statement. It is all about those fine, extended lines.
Start with Thin Lines: Using a very fine-tipped liquid eyeliner or a precise brush with gel liner, draw two extremely thin lines extending from just above the center of your upper lip outwards. These lines should be much thinner than any other mustache style.
You want these lines to be, you know, almost like delicate brushstrokes, very light at first.
Extend and Point Upward: Continue extending these thin lines, letting them go past the corners of your mouth. As they extend, gradually angle them upward, creating a sharp, pointed tip that reaches towards your temples. The key is to keep them very thin and distinct.
This style, basically, relies on that dramatic upward sweep, so make it long and lean.
Darken and Refine: Once you have the shape, carefully go over the lines to darken them to your desired intensity. Use cotton swabs with makeup remover to sharpen the points and ensure the lines are perfectly straight and thin.
This is a style that, you know, really benefits from precision and a very clean finish.
Tips for a Great Look
Getting a fantastic mustache drawing on face is not just about the drawing itself; a few extra tips can really elevate your creation. These pointers help with symmetry, staying power, and overall appearance.
Symmetry is Key: Try to make both sides of your drawn mustache as similar as possible. You know, stand back from the mirror often to check your progress from a distance. Sometimes, looking at it from different angles helps you spot unevenness.
You can even use a small ruler or the straight edge of a credit card to help guide your initial lines for better balance. It is a little trick that can help, honestly.
Start Light, Build Up: Do not apply too much product at once. It is much easier to add more color or widen a line than it is to take it away. Start with a light outline and gradually fill in or darken as needed.
This method, basically, gives you more control and reduces the chance of making a big mistake that is hard to fix.
Practice Makes Perfect: If you are new to drawing on your face, try practicing on your hand or a piece of paper first. This helps you get a feel for the tools and the makeup before you apply it to your face. You know, it is a bit like sketching before you paint.
The more you practice, the more confident your strokes will become, which really shows in the final result.
Consider Your Face Shape: Your text mentions looking for a mustache style to suit your face. Even for drawn mustaches, thinking about your face shape can help you pick a style that complements your features. A wider face might suit a fuller mustache, while a narrower face might look better with a thinner one. It is all about balance, really.
This consideration, you know, helps ensure your drawn mustache looks natural and flattering, even if it is just for fun.
Set It: Once you are happy with your drawn mustache, a light mist of setting spray or a dusting of translucent powder can help it last longer and prevent smudging. This is especially important if you are wearing it for an event or a long period.
This step, pretty much, seals the deal and keeps your artwork looking fresh for hours.
Troubleshooting Common Issues
Even with the best planning, you might run into a few hiccups when creating your mustache drawing on face. Do not worry; most common issues have simple fixes. It is all part of the creative process, you know.
Smudging: If your mustache starts to smudge, it could be due to oily skin, touching your face, or not setting the makeup. To fix it, gently blot the smudged area with a clean cotton swab, then reapply a small amount of makeup. Remember to set your mustache with powder or spray to prevent future smudges.
Using a setting spray, you know, can really help with this problem, keeping everything in place.
Uneven Lines: If your lines are wobbly or uneven, use a cotton swab dipped in makeup remover to carefully clean up the edges. Then, go back and redraw the line slowly and steadily. Resting your elbow on a table can help stabilize your hand.
It is, basically, about taking your time and making small corrections as you go, which is quite effective.
Color Not Showing Up: If your chosen makeup is not appearing dark enough, try building up the color in thin layers instead of pressing too hard. For pencils, make sure they are sharpened. For face paints, add less water to make the pigment more concentrated.
Sometimes, the product itself might need a bit of warming up on your hand before applying to the face, which can help with color payoff, you know.
Irritation: If your skin feels itchy or irritated, remove the makeup immediately with a gentle cleanser. Always use makeup products specifically designed for use on the face, and do a small patch test on your arm first if you have sensitive skin. This is pretty important for skin health.
Your skin, honestly, should feel comfortable with the product you are using, so pay attention to any signs of discomfort.
Taking It Off: Easy Removal
When the fun is over, removing your mustache drawing on face should be quick and easy. You want to take it off gently to avoid irritating your skin. The removal process depends a bit on the type of makeup you used, too.
For eyeliner pencils, gel liners, or eyeshadow, a regular makeup remover or micellar water on a cotton pad usually does the trick. Just gently wipe the area until all the color is gone. You know, a good quality makeup remover makes this a breeze.
For face paint, warm water and a mild soap are often enough. Some face paints are water-activated and water-removable, which is very convenient. Just lather up and gently wash your face. If there is any stubborn residue, a bit of makeup remover can help. So, it is pretty straightforward.
After removing the makeup, wash your face again with your regular cleanser and apply a light moisturizer to keep your skin happy and hydrated. This step, basically, helps your skin recover after being covered in makeup for a while.
Mustache Styles to Consider
Your text mentions that mustaches have been worn in various styles throughout history, and that there are 21 different mustache types with images. When you are doing a mustache drawing on face, you get to explore many of these without the commitment of growing one. This is pretty exciting, as you can try on different personas.
Beyond the pencil, chevron, handlebar, and Dalí styles we talked about, there are so many others